I have written quite a few articles on ECDIS. And I try to be as detailed as possible.
And all those articles on ECDIS are detailed enough.
These articles need to be detailed because ECDIS is comparatively a new thing and information is neither easily available nor easily understood.
But that is not the case with Navtor.
Navtor is one of the simplest software to use with any of the ECDIS.
Even if you have not used Navtor yet, I am sure that by the end of this article you would agree with me on its simplicity and ease of use.
Read on to believe me what I just said about Navtor.
What is Navtor?
Navtor defines itself as
a leading force in the provision of innovative e-Navigation solutions, and a total supplier of navigational products and services for the maritime sector. Every day we strive to make life easier for navigators, and safer, clearer and more efficient for shipowners, ship managers, and operators.
In simple words,
- Navtor supplies paper charts and paper publications
- Navtor is one of the ways for receiving e-corrections (NM) on board the ships
- Navtor supplies the ENCs for the ECDIS
- Navtor provides the corrections for the ENCs
If you have worked with Chartco, you might have noticed that the chartco does exactly the same.
Yes, Navtor can be considered to be the competitor of chartco.
But when it comes to the simplicity and ease of use, Hands down, Navtor has an edge over chartco.
When it comes to e-navigation, Navtor offers four products
As this article is about using Navtor to order, receive ENCs and update the ENCs on ECDIS, I would focus mainly on
- Nav Sync and Nav Stick; and
- Nav Box
- Nav-Tracker
Ordering ENCs
With Navtor, the ENCs for the ECDIS are ordered through Nav-Tracker software.
Each ship will have the Nav tracker installed on a ship’s computer. User ID and password will be provided for logging in to nav tracker.
But before we understand how to order ENCs on Navtor, we need to understand few things used in Nav Tracker.
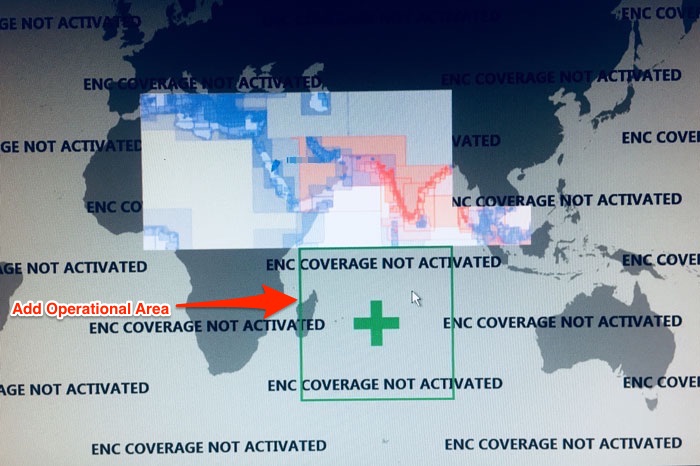
Setting up the ship’s operational area
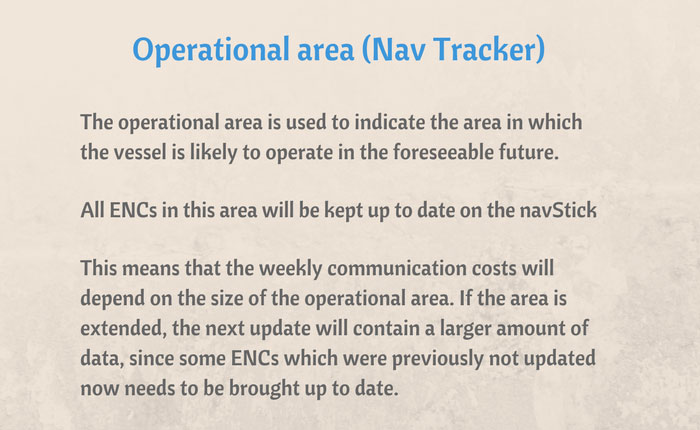
The operational area is the ship’s trading area. Once set up, the Navtor will only send the corrections for the ENCs in this area.
So it is important that the operational area is set up correctly.
When you click on the Nav tracker icon, the login screen will open.
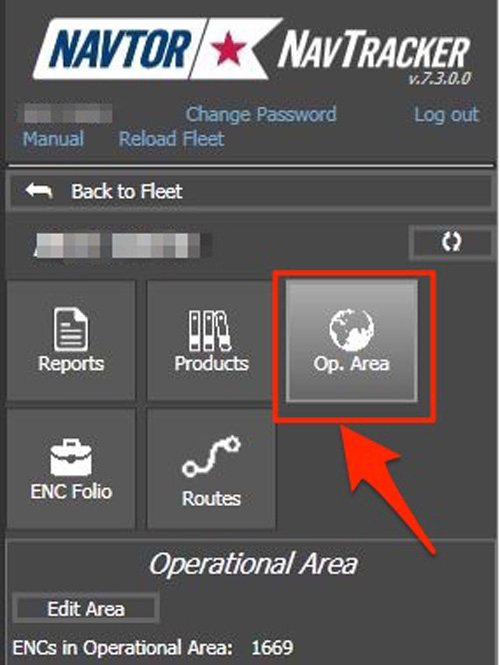
Once logged in to the Nav tracker, click on the operational area.
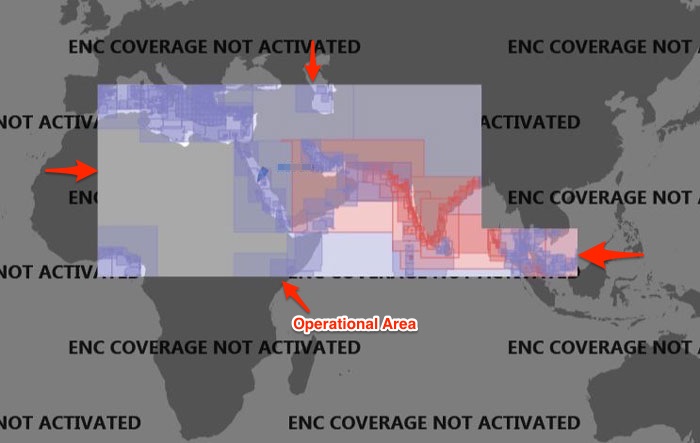
This will show the operational area set in the Nav-Tracker.
If we wish to extend the operational area to this, we can just click on the “Edit Area”, bring the mouse to the area that needs to be added and click on it.
If you wish to select a smaller or larger area, you can zoom in or out on the screen.
Similarly to exclude an area from the operational area, we can take the pointer to the operational area and click when it shows a minus sign on the area. 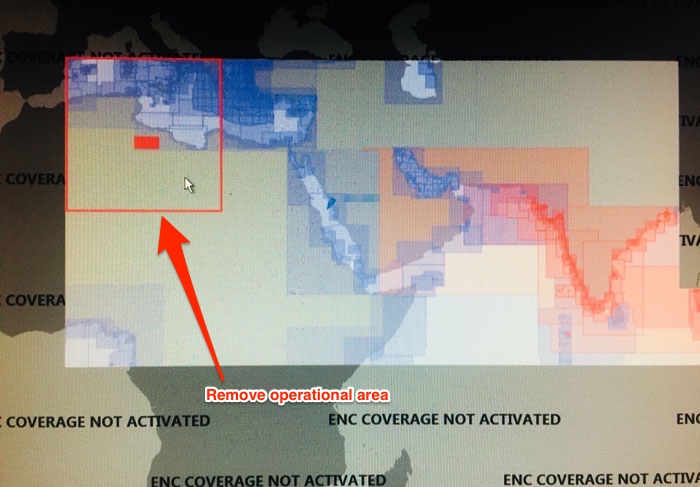
Once the operational area is set, just click on the Save and you have set the operational area of the ship in the Navtor.
You will receive all the updates for this area only.
Creating a route in Nav-Tracker
To order ENCs for a voyage, we first need to create a route in the Nav tracker.
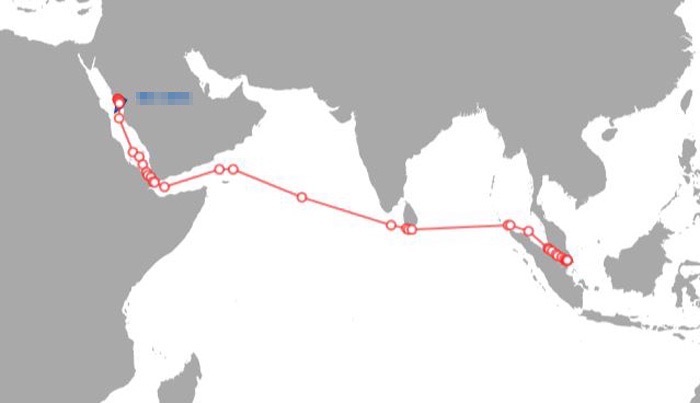
Let us say the vessel’s next voyage is from Yanbu to Singapore.
To know the ENCs required for this voyage and out of these ENCs the one not available or expiring, we need to have the voyage route in the Nav-Tracker.
This route can either be created manually in the Nav-Tracker or imported as ECDIS route file.
Importing the ECDIS route file
Store the route file (in this case Yanbu-Singapore route) from ECDIS to a USB flash drive.
Connect this flash drive to the computer with Nav-Tracker.
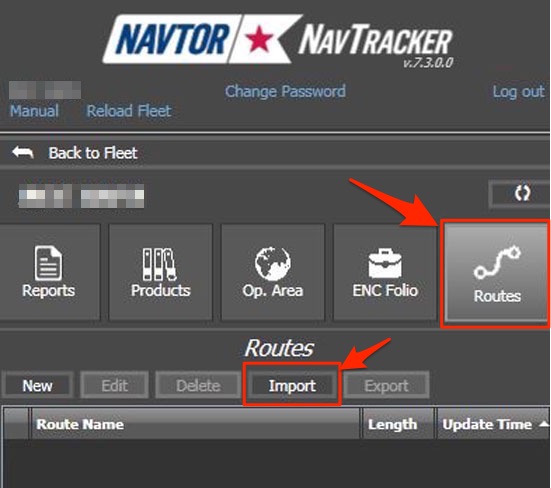
To import the route file, click on the routes option in the Nav-Tracker and then click “Import”
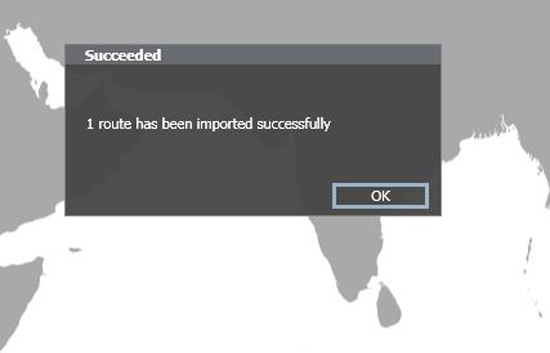
Choose the route file and click OK. This will import the route into the Nav-Tracker. A success message will be shown once the route is imported.
The imported route will be visible under the Route tab as well as on the map.
Creating a route Manually
You can also create the route manually in the Nav-Tracker but importing the route is much convenient.
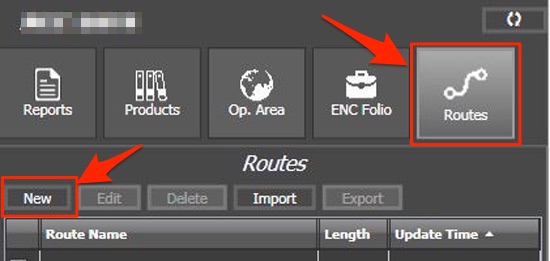
To create the route manually, go to “Routes” and click on “New”.
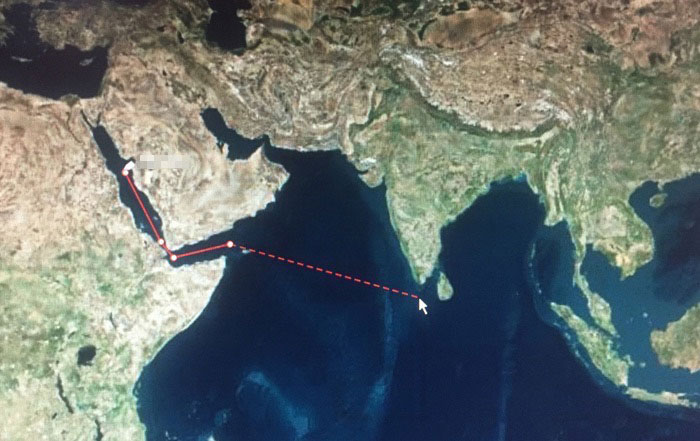
Now on the map in Nav-Tracker, take the mouse pointer to each of the waypoints and left click to add the waypoint into the route.
This is similar to making a route on the ECDIS.
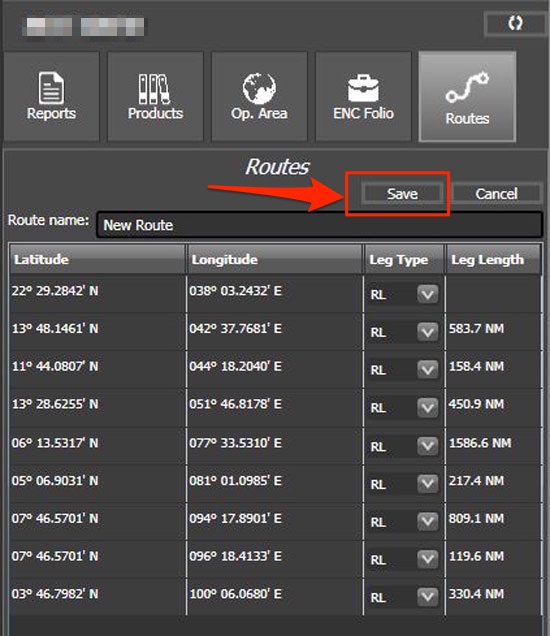
Once all the way points have been added, just click save to save the route.
PAYS and non-PAYS ENCs
Now before we move on to the process of ordering the ENCs on Navtor, we need to understand the concept of PAYS and non-PAYS ENCs.
PAYS ENCs
PAYS stands for Pay As You Sail. We do not need to order these ENCs.
As and when you sail on these ENCs, the cost is automatically billed to the ship operator.
Vessel’s position is tracked to know the ENCs actually used by the vessel.
All these ENCs (PAYS ENCs) for the set operational area are already there in the ECDIS. Navigators can use these ENCs for making the passage plan and other planning purposed without any cost to the operator.
Ship operator only needs to pay when the ship actually uses these ENCs for navigation.
Non-PAYS ENCs
There are few handful ENCs issuing countries that have not agreed to the PAYS system.
So these ENCs are not available for PAYS. These ENCs need to be ordered beforehand during the passage planning process.
How to order ENCs on Navtor
We are ready now to understand the process of ordering ENCs on Navtor.
As we understand now, we do not need to order PAYS ENCs. It is only Non-PAYS ENCs that are required to be ordered.
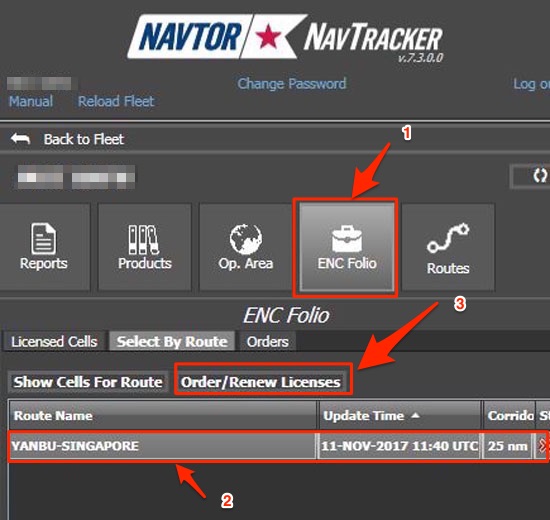
To order the required ENCs, go to “ENC Folio” option in the Nav-Tracker. From the list of the route, select the route you wish to order ENCs for.
Then click on the Order/renew licenses tab.
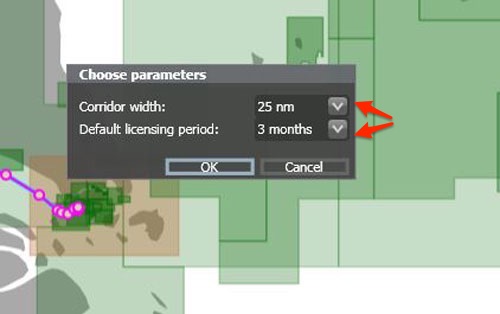
This will show a pop up to “choose Parameters”
- Corridor Width
- Default licensing period
Corridor width is the distance from the planned course line for which we wish to have the ENCs.
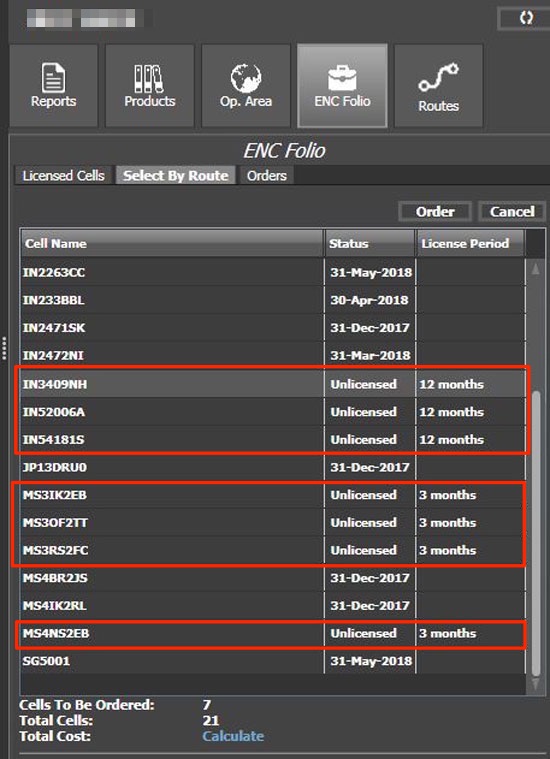
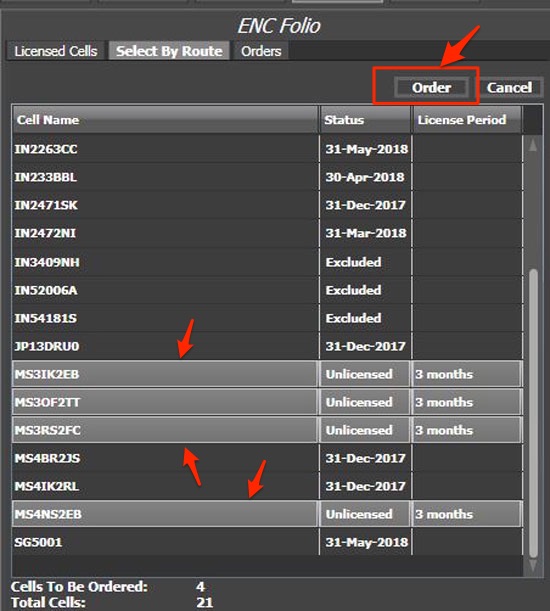
Once we choose parameters and click OK, this will give us the list of required non-PAYS ENCs for the voyage with their status.
As we can see there are 7 ENCs that we need to order.
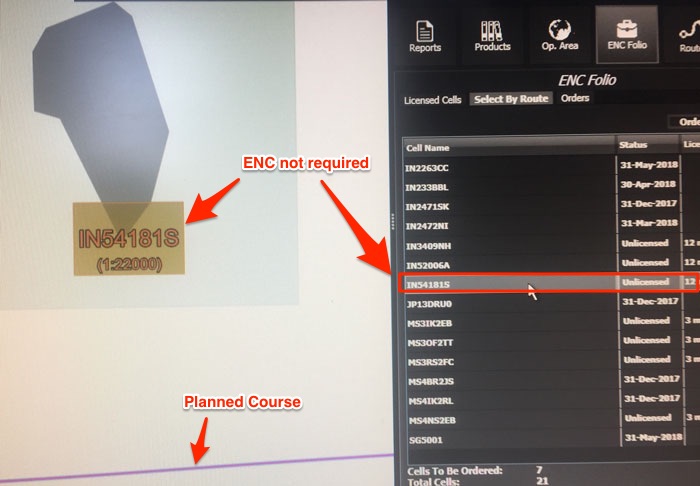
If you click on any of these ENCs, it will show the location of this ENC on the map.
Check each of these ENCs to ensure that these will absolutely be required.
For example, ENCs such as for this area may not be required for this voyage as this ENC is large scale ENC for an area which is not relevant for the voyage.
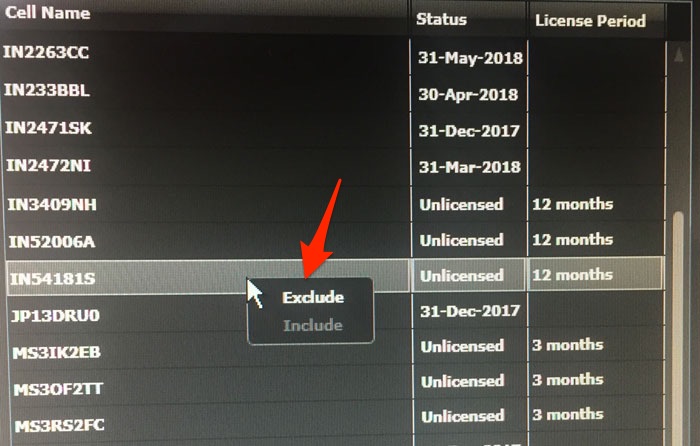
I want to remove this ENC from the order. To remove, just right click on the ENC and select “Exclude”.
Once you have finalized the list of ENCs to be ordered, Select these ENCs and click on “Order”.
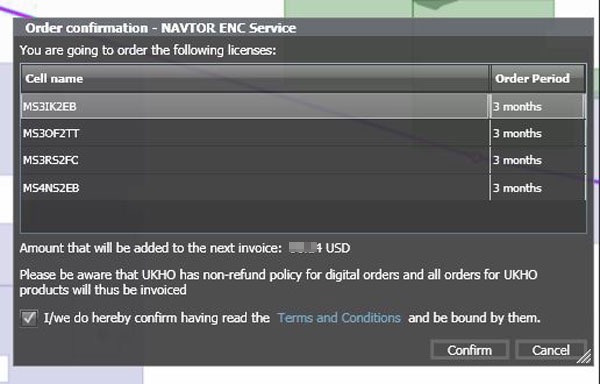
This will ask for the “order confirmation”. Click ‘Confirm” to create the order.
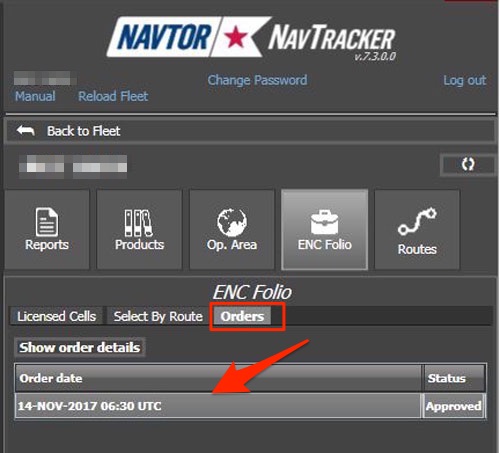
This order can be found under the “Orders” tab.
We have successfully created the orders for ENCs for the next voyage. The requested ENCs will be delivered in next update in the Navbox.
Importing and Correcting the ENCs
We have ordered the required ENCs for the voyage. But we need to get these and transfer to the ECDIS.
Navtor provides the ENCs and updates to the ENCs through
- NavBox
- NavSync and NavStick
NavBox
The Nav box is the software installed on the computer that contains all the ship’s ENC data and its updates. If this NavBox is connected with the ECDIS, all the updates will automatically be transferred to the ECDIS.
Navigators do not need to do anything with respect to updating the ENCs for weekly corrections.
If the ship’s NavBox is connected to the internet, the ordered ENCs will be available within one hour of ordering.
NavSync and NavStick
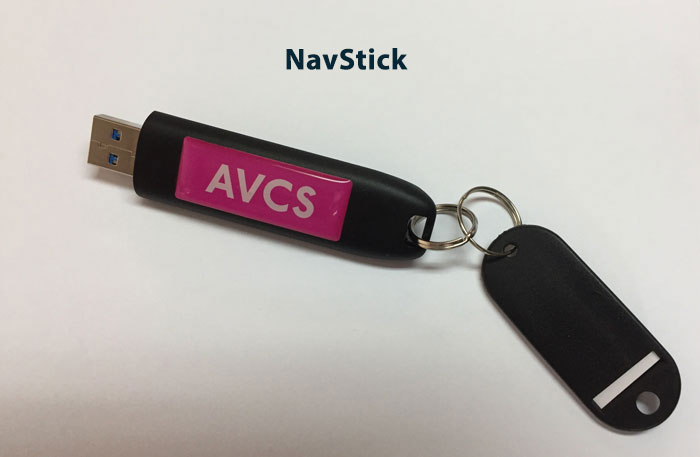
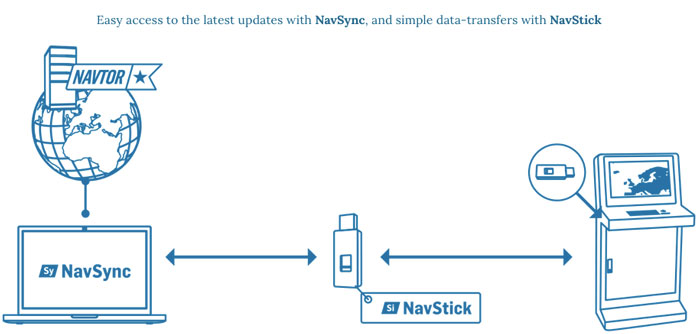
NavStick is the USB drive provided by Navtor which need to be updated every week for the weekly corrections and whenever new ENCs are ordered.
NavStick is updated (Synchronised) with a software called NavSync.
This is how NavSync and NavStick work together for updating ENCs.
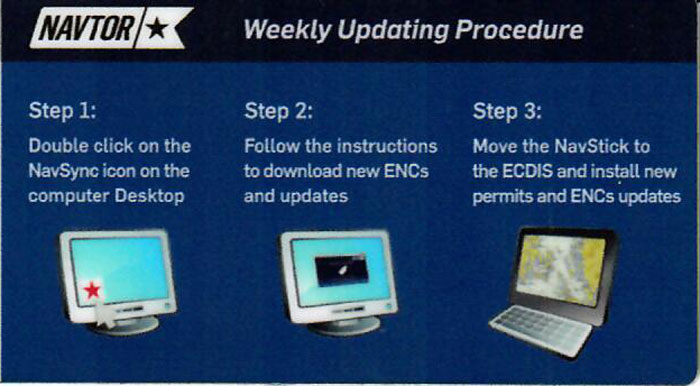
The synchronization process is as simple as 1,2,3.
Yes, you heard that right. No need to update AIO separately and no need to update base cells. All will be collected automatically by updating the Nav Stick and then transferring it to ECDIS in one go.
To Update the NavStick with latest updates, insert the NavStick to the computer with NavSync software.
Make sure that the internet connection is available on the NavSync computer.
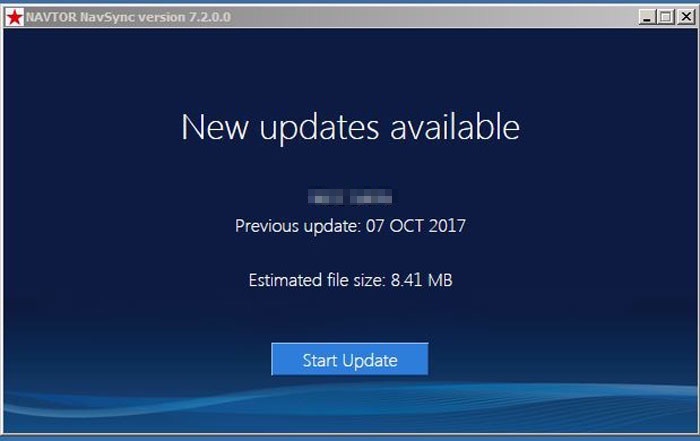
Open NavSync and it will show if the new updates are available for the NavStick.
These updates will include permits for any new ENCs ordered. Once it shows new updates as available, click on “Start Update”.
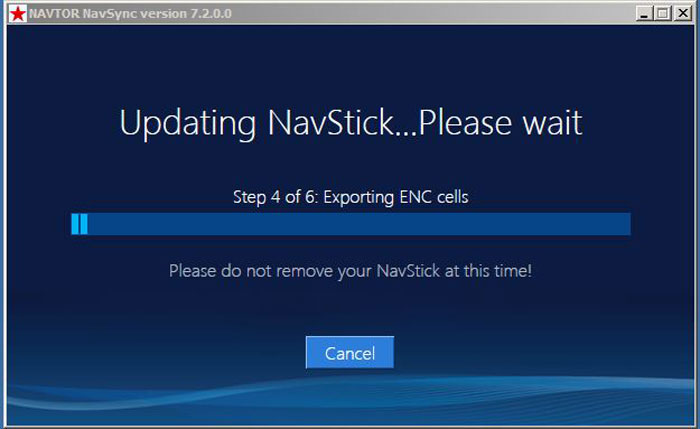
It will start the updating of the Nav Stick.
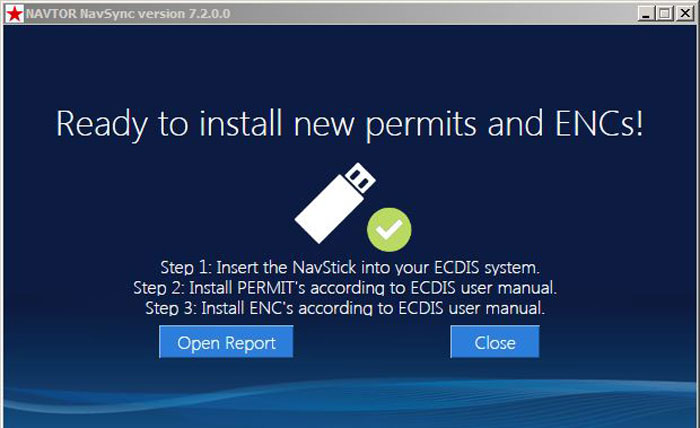
Once the process of updating the Nav Stick is complete, it will show the message “ready to install new permits and ENCs.”
Now the Nav Stick is ready with new updates and can be used on the ECDIS to install these updates.
Each make of ECDIS have their own instructions to install updates and we need to follow these instructions.
In fact, I have covered that in of these blogs.
For JRC ECDIS, I have covered in this blog A step by step guide to ordering and correcting charts on ECDIS
For FURNO ECDIS, I have covered some extent of that in this blog How to Install ENCs on Furuno ECDIS- Step by Step Guide
Conclusion
Navtor is the most simple way to order the ENCs for the ECDIS and keep the ENCs updated.
Nav-Tracker software from Navtor handles the ordering part for the ENCs.
Nav Sync is the easiest way to keep the ENCs updated. Whenever new updates are available through Nav Sync or Nav Box, the ship will get a notification email.
Then we just need to connect the Nav Stick to the computer where Nav Sync is installed.
The Nav Stick will get updated and we can simply insert this Nav Stick to the ECDIS to update ENCs.
To update ENCs on the ECDIS we just need to follow the instructions of the ECDIS maker.
Welcome to the world of high tech shipping industry.
Share this:

About Capt Rajeev Jassal
Capt. Rajeev Jassal has sailed for over 24 years mainly on crude oil, product and chemical tankers. He holds MBA in shipping & Logistics degree from London. He has done extensive research on quantitatively measuring Safety culture onboard and safety climate ashore which he believes is the most important element for safer shipping.
Search Blog
13 Comments


thank u sir..u r working hard to make ease for us

Thanks Mohyminul....

How to determine whether ecdis is corrected up to date?

Sir, Pls advise how to set operational/order chart if internet is not working

Sir Pls advise how to set operational area or order charts if internet is not working

Hello sir Why am I not able to increase my corridor width while ordering the Enc's . Our company just switched over from gns to navtor

why did you switch from GNS to Navtor? i find GNS is better.

Dear sir, pls advice what is coridor width when ordering enc ? What is a recomendation ? Thanks in advans ..if anybody knows here advice pls

Many thanks for sharing the knowledge sir, keep it up.

I was asked to give my thoughts on GEARHEADPANACEA.COM because I was pleased with how my score improved and how much they taught me. To whom it may concern, all I can say is that they are good at their job and if you need any cyber related help you can visit their website or email gearheadcyberpanacea@gmail.com

After falling victim to fraud twice trying to recover my stolen USDT, I gave up on the possibilities of ever being able to have it recovered until Gear Head Cyber Panacea was recommended on Quora and I was very grateful to have come across the article as they recovered 85% of my stolen USDT and so I decided to share this for anyone else that might be in need of their services..you can reach them on Gearheadcyberpanacea AT gmail DOT com or check out their website GEARHEADPANACEA dot COM
Leave Comment
More things to do on myseatime

MySeaTime Blogs
Learn the difficult concepts of sailing described in a easy and story-telling way. These detailed and well researched articles provides value reading for all ranks.

Seafarers Question Answers
Ask or answer a question on this forum. Knowledge dies if it remains in our head. Share your knowledge by writing answers to the question

MySeaTime Podcast
This podcast on the maritime matters will provide value to the listeners. Short, crisp and full of value. Stay tuned for this section.


thankyou sir. the owners just installed navtor onboard our ship and this will help me alot as a second officer.
Glad you found it useful Eric...